Flows
A “Flow” refers to a logically linked sequence of “Stages”. This is useful when one wishes to enforce the order in which an “Artifact” progresses through “Stages”.
When an “Artifact” is assigned to a “Flow”, two rules come into play:
- The artifact can only be added to the first stage of the flow. Any attempt to add it to another stage will result in an error.
- Artifacts can be moved through the “Flow”. To achieve this, one must use the dedicated “Push” endpoint, specifying both the artifact in question and the stage from which it should be moved.
“Flows” can be either active or inactive. Artifacts cannot be added to an inactive flow.
Every “Flow” has a name and an optional description. The name acts as a unique identifier for the flow and is case-sensitive. Additionally, a “Flow” comprises a number of “Stages” that form a logical sequence.
To further enhance your understanding of managing and editing flows within artifactz.io, we’ve curated a comprehensive video tutorial. Dive into the intricacies of flow management and editing to streamline your workflow efficiently.

To view the current list of flows, navigate to the “Flows” section by selecting the “Flows” option from the left-hand menu.
Below is a preview of the section:
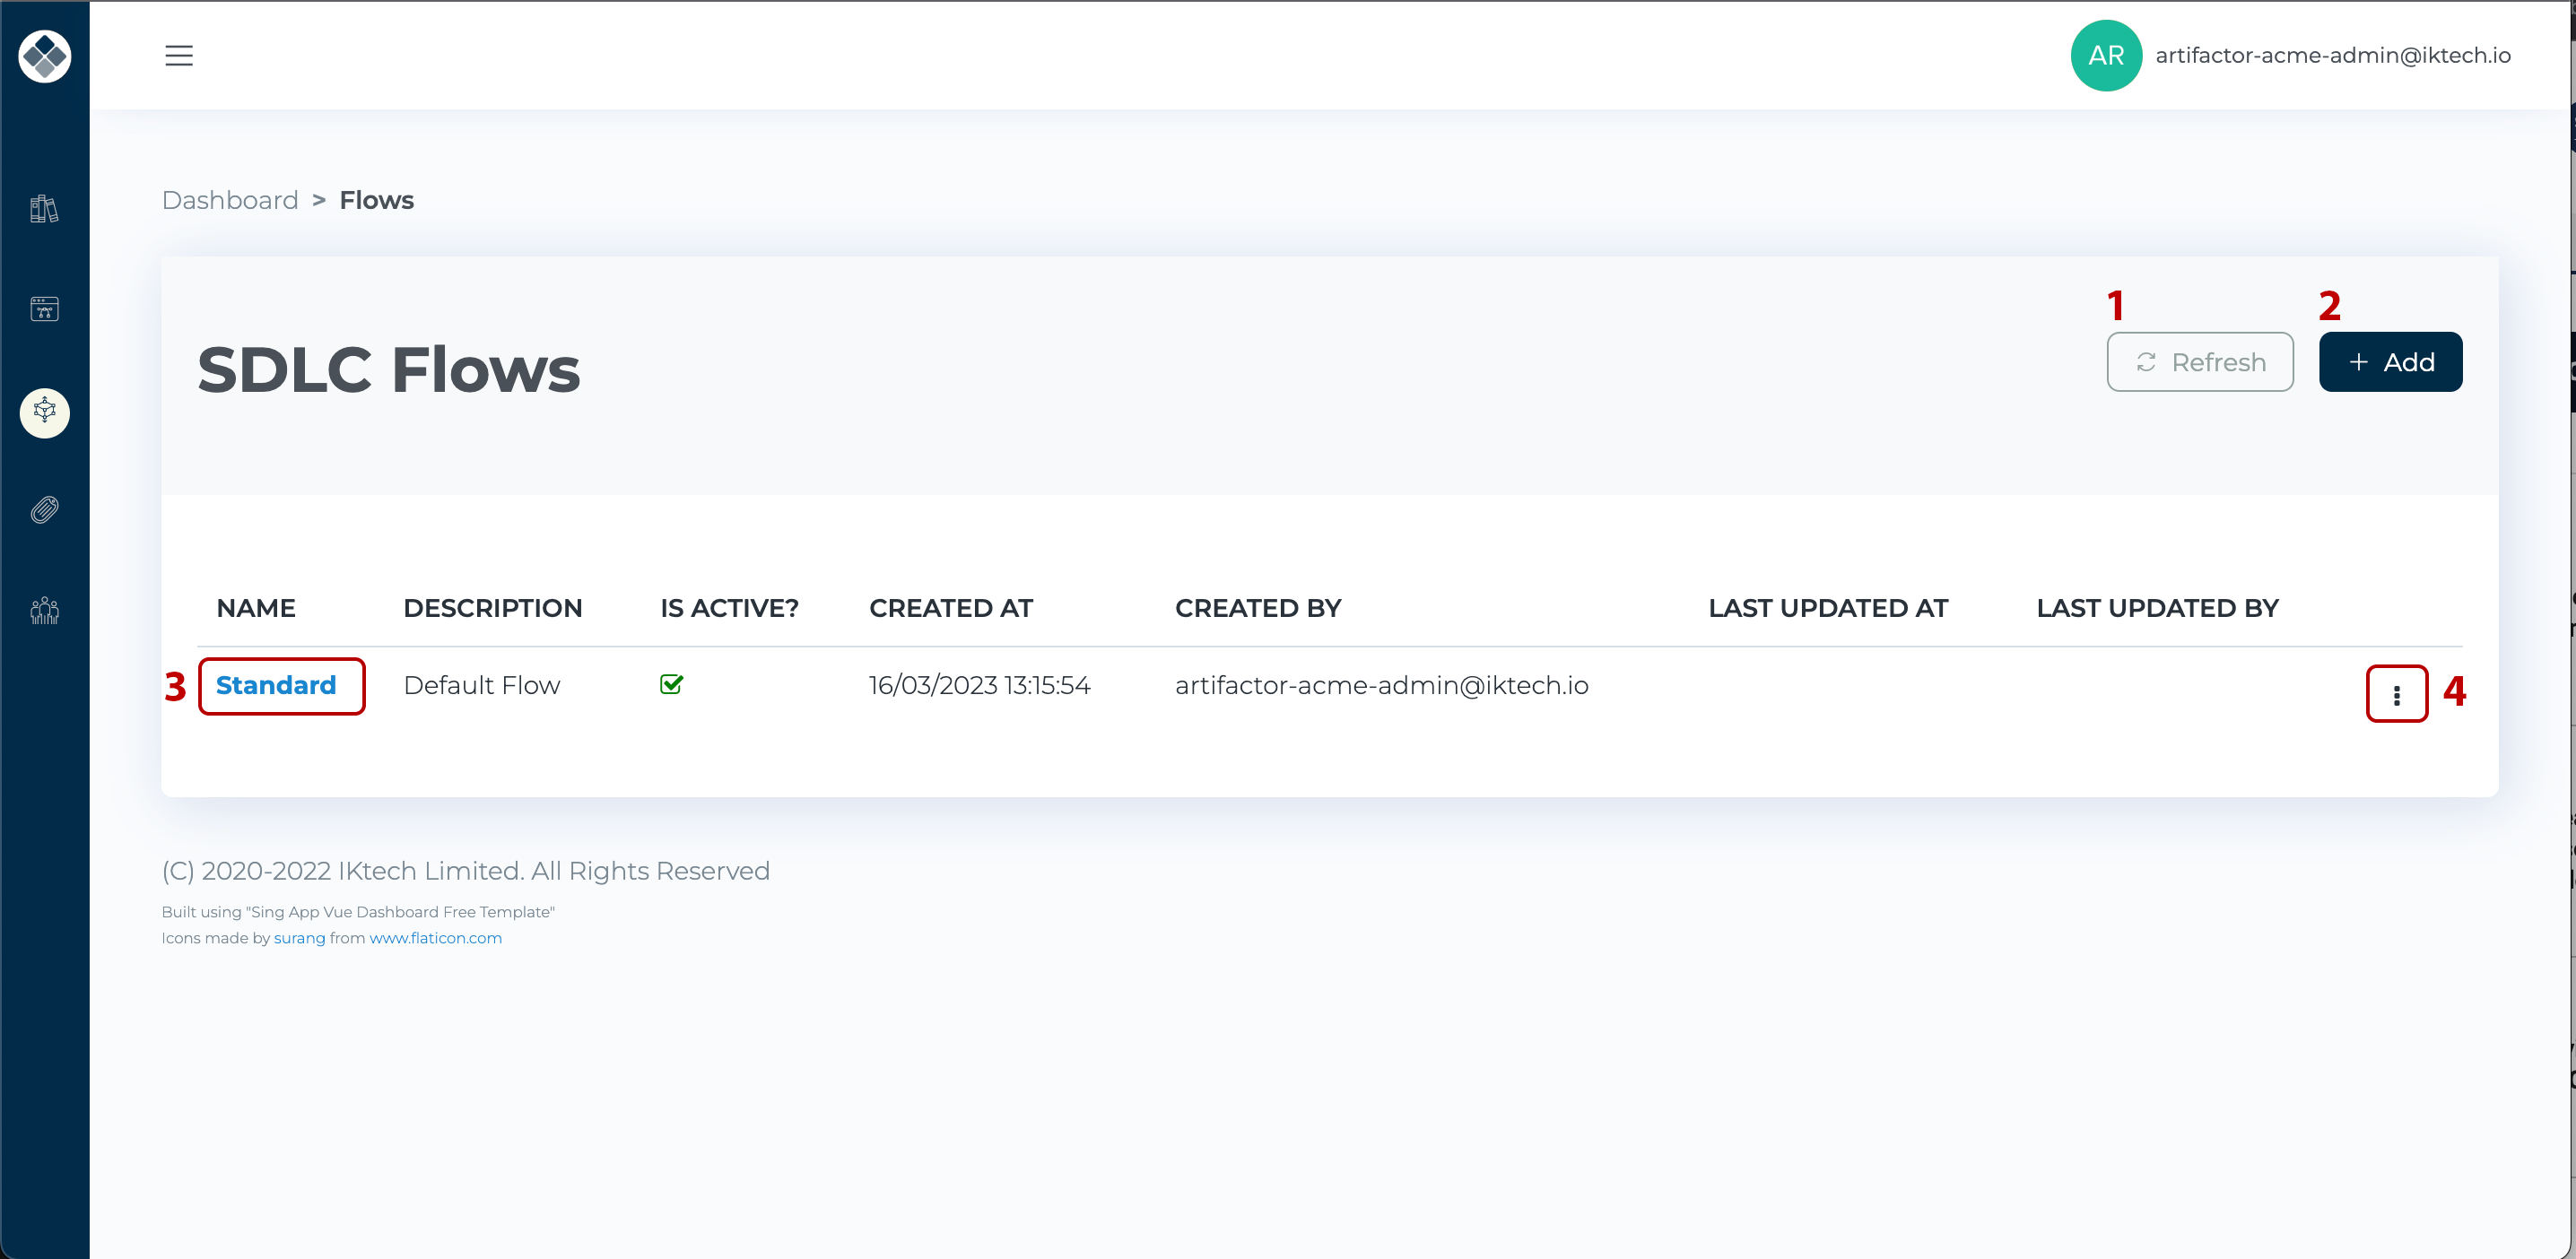
Each row in the table represents a flow that has been defined for your tenant.
- To refresh the contents of the Flows View Screen, click the “Refresh” button labeled [1].
- To modify the metadata of a Flow, deactivate, activate, or delete a flow, utilize the context menu indicated by [4] at the right end of each row.
From this section, you can add a new flow, edit details of an existing flow, or deactivate, activate, or delete a flow.
To create a new flow, click the “Add” button [2] on the Flows page. A pop-up dialog box, as shown below, will appear:
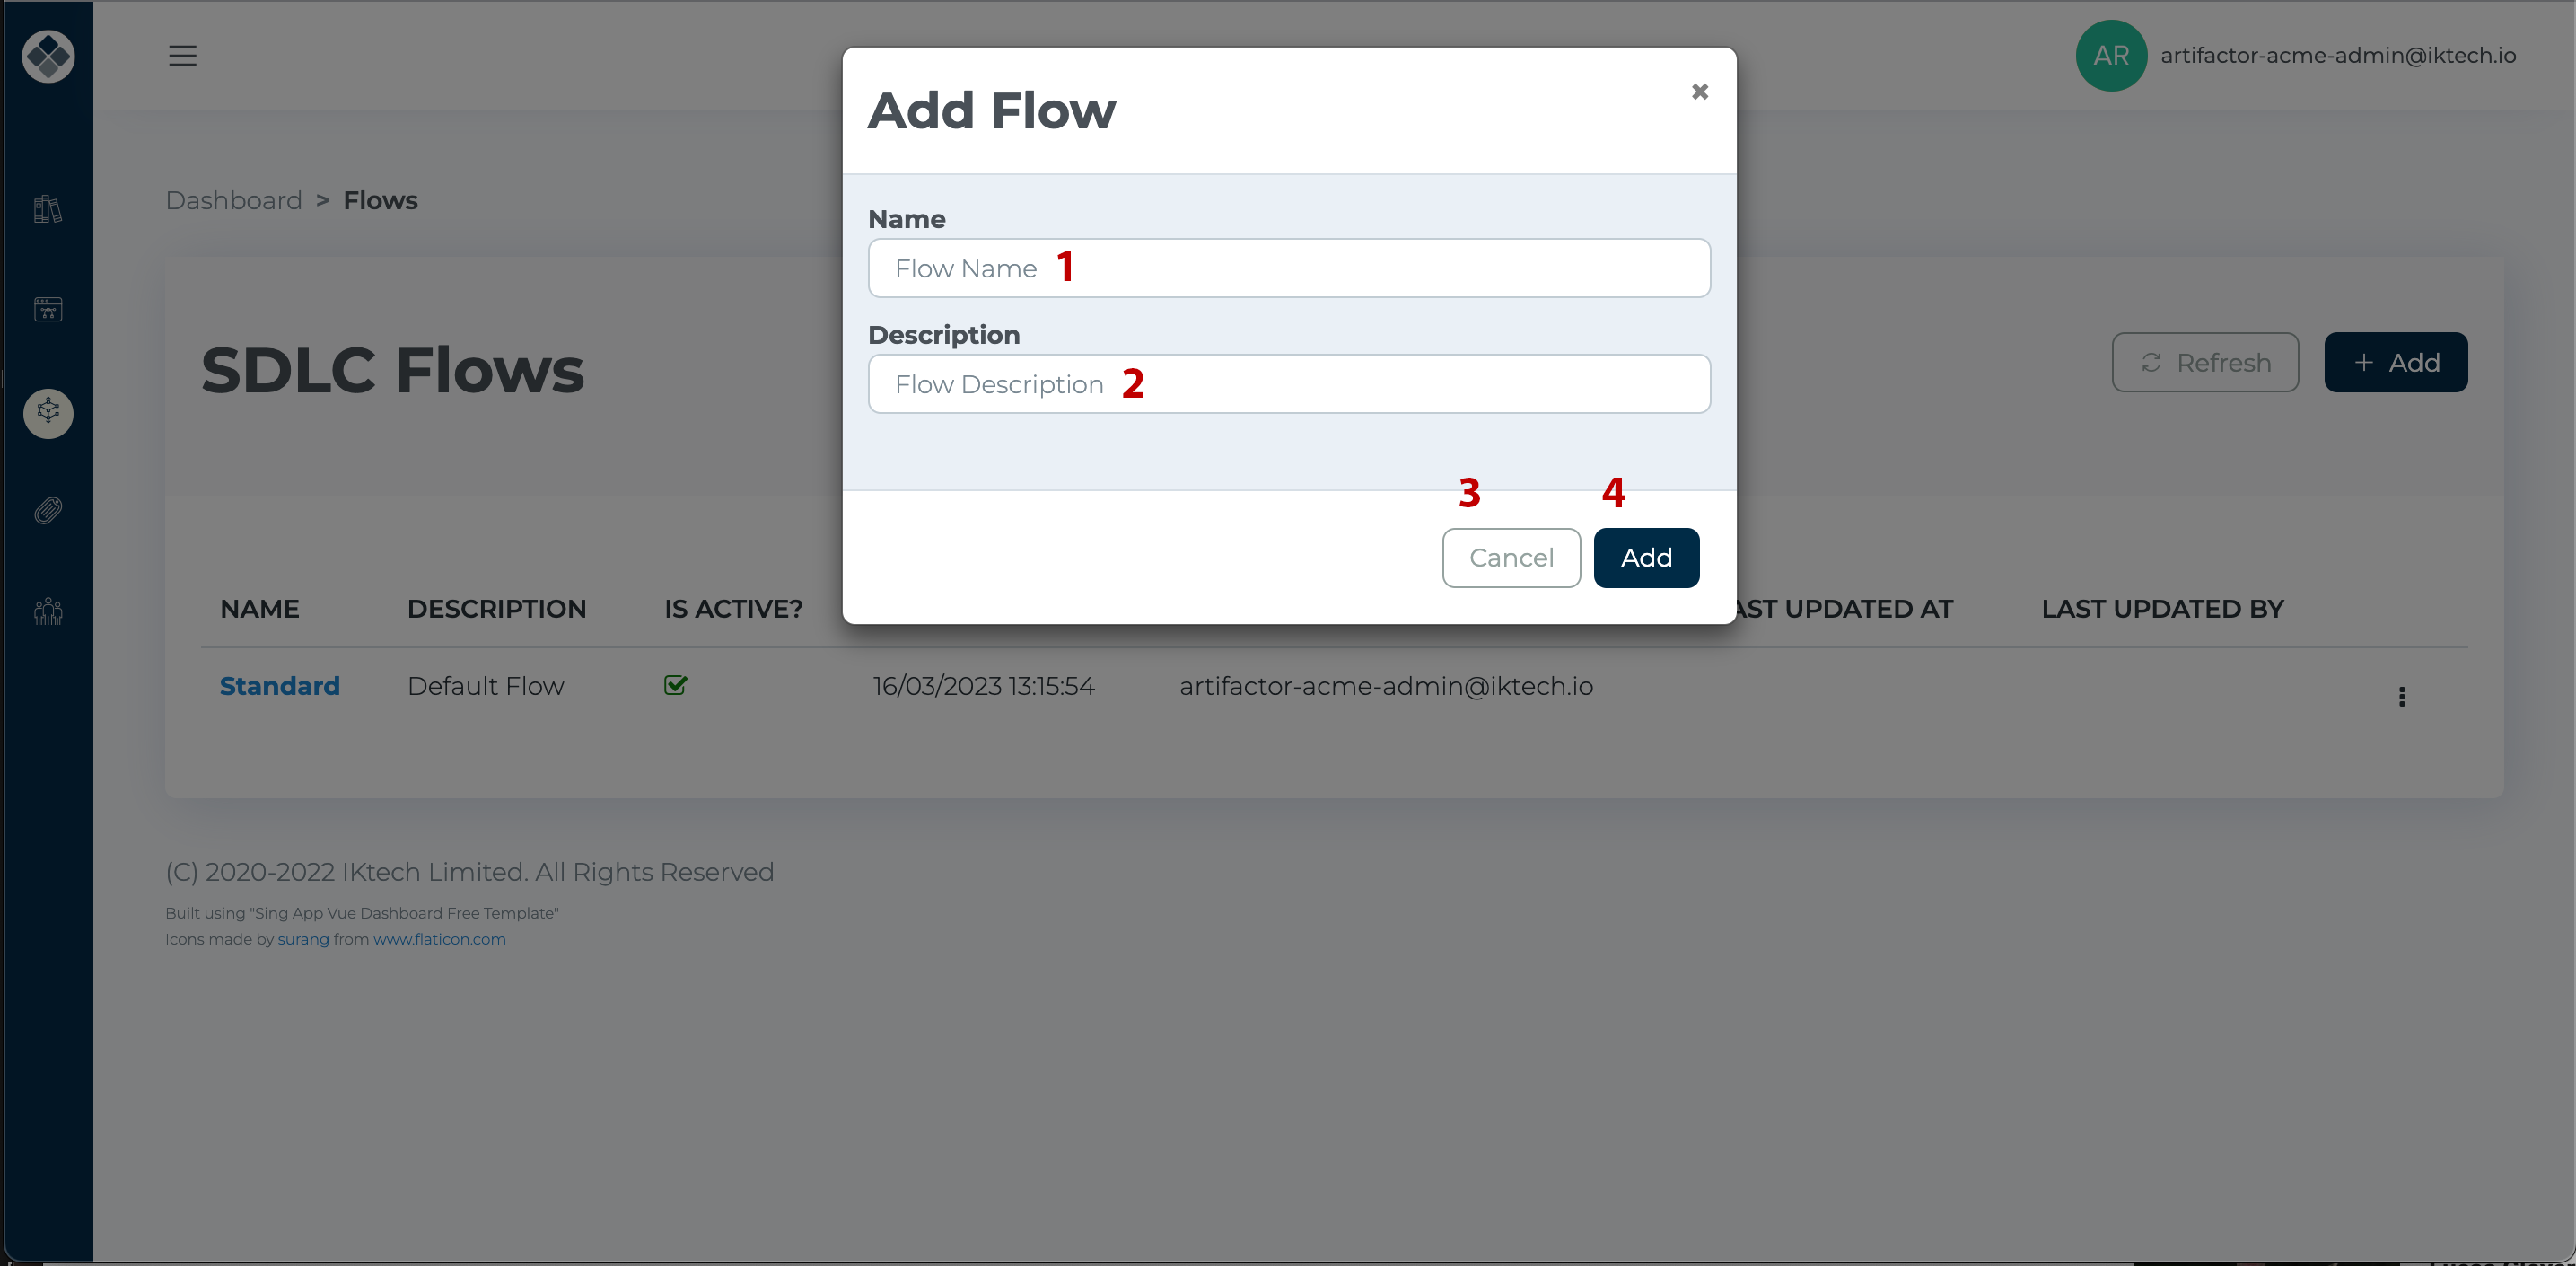
In the dialog box, define the Name [1] and an optional Description [2] for the new flow. Click “Add” [4] to finalize. If you wish to cancel the process, click the “Cancel” [3] button.
To access the context menu on the “Flows View Screen”, click the “three dots” button [4]. This action will reveal the context menu.
The contents of the context menu vary based on the active status of the flow. For “active” flows, the context menu provides “Edit” and “Deactivate” options, as shown below:

The “Edit” option allows you to adjust the flow”s metadata, such as its name or description. The “Deactivate” option disables the flow.
For inactive flows, an alternative context menu appears:
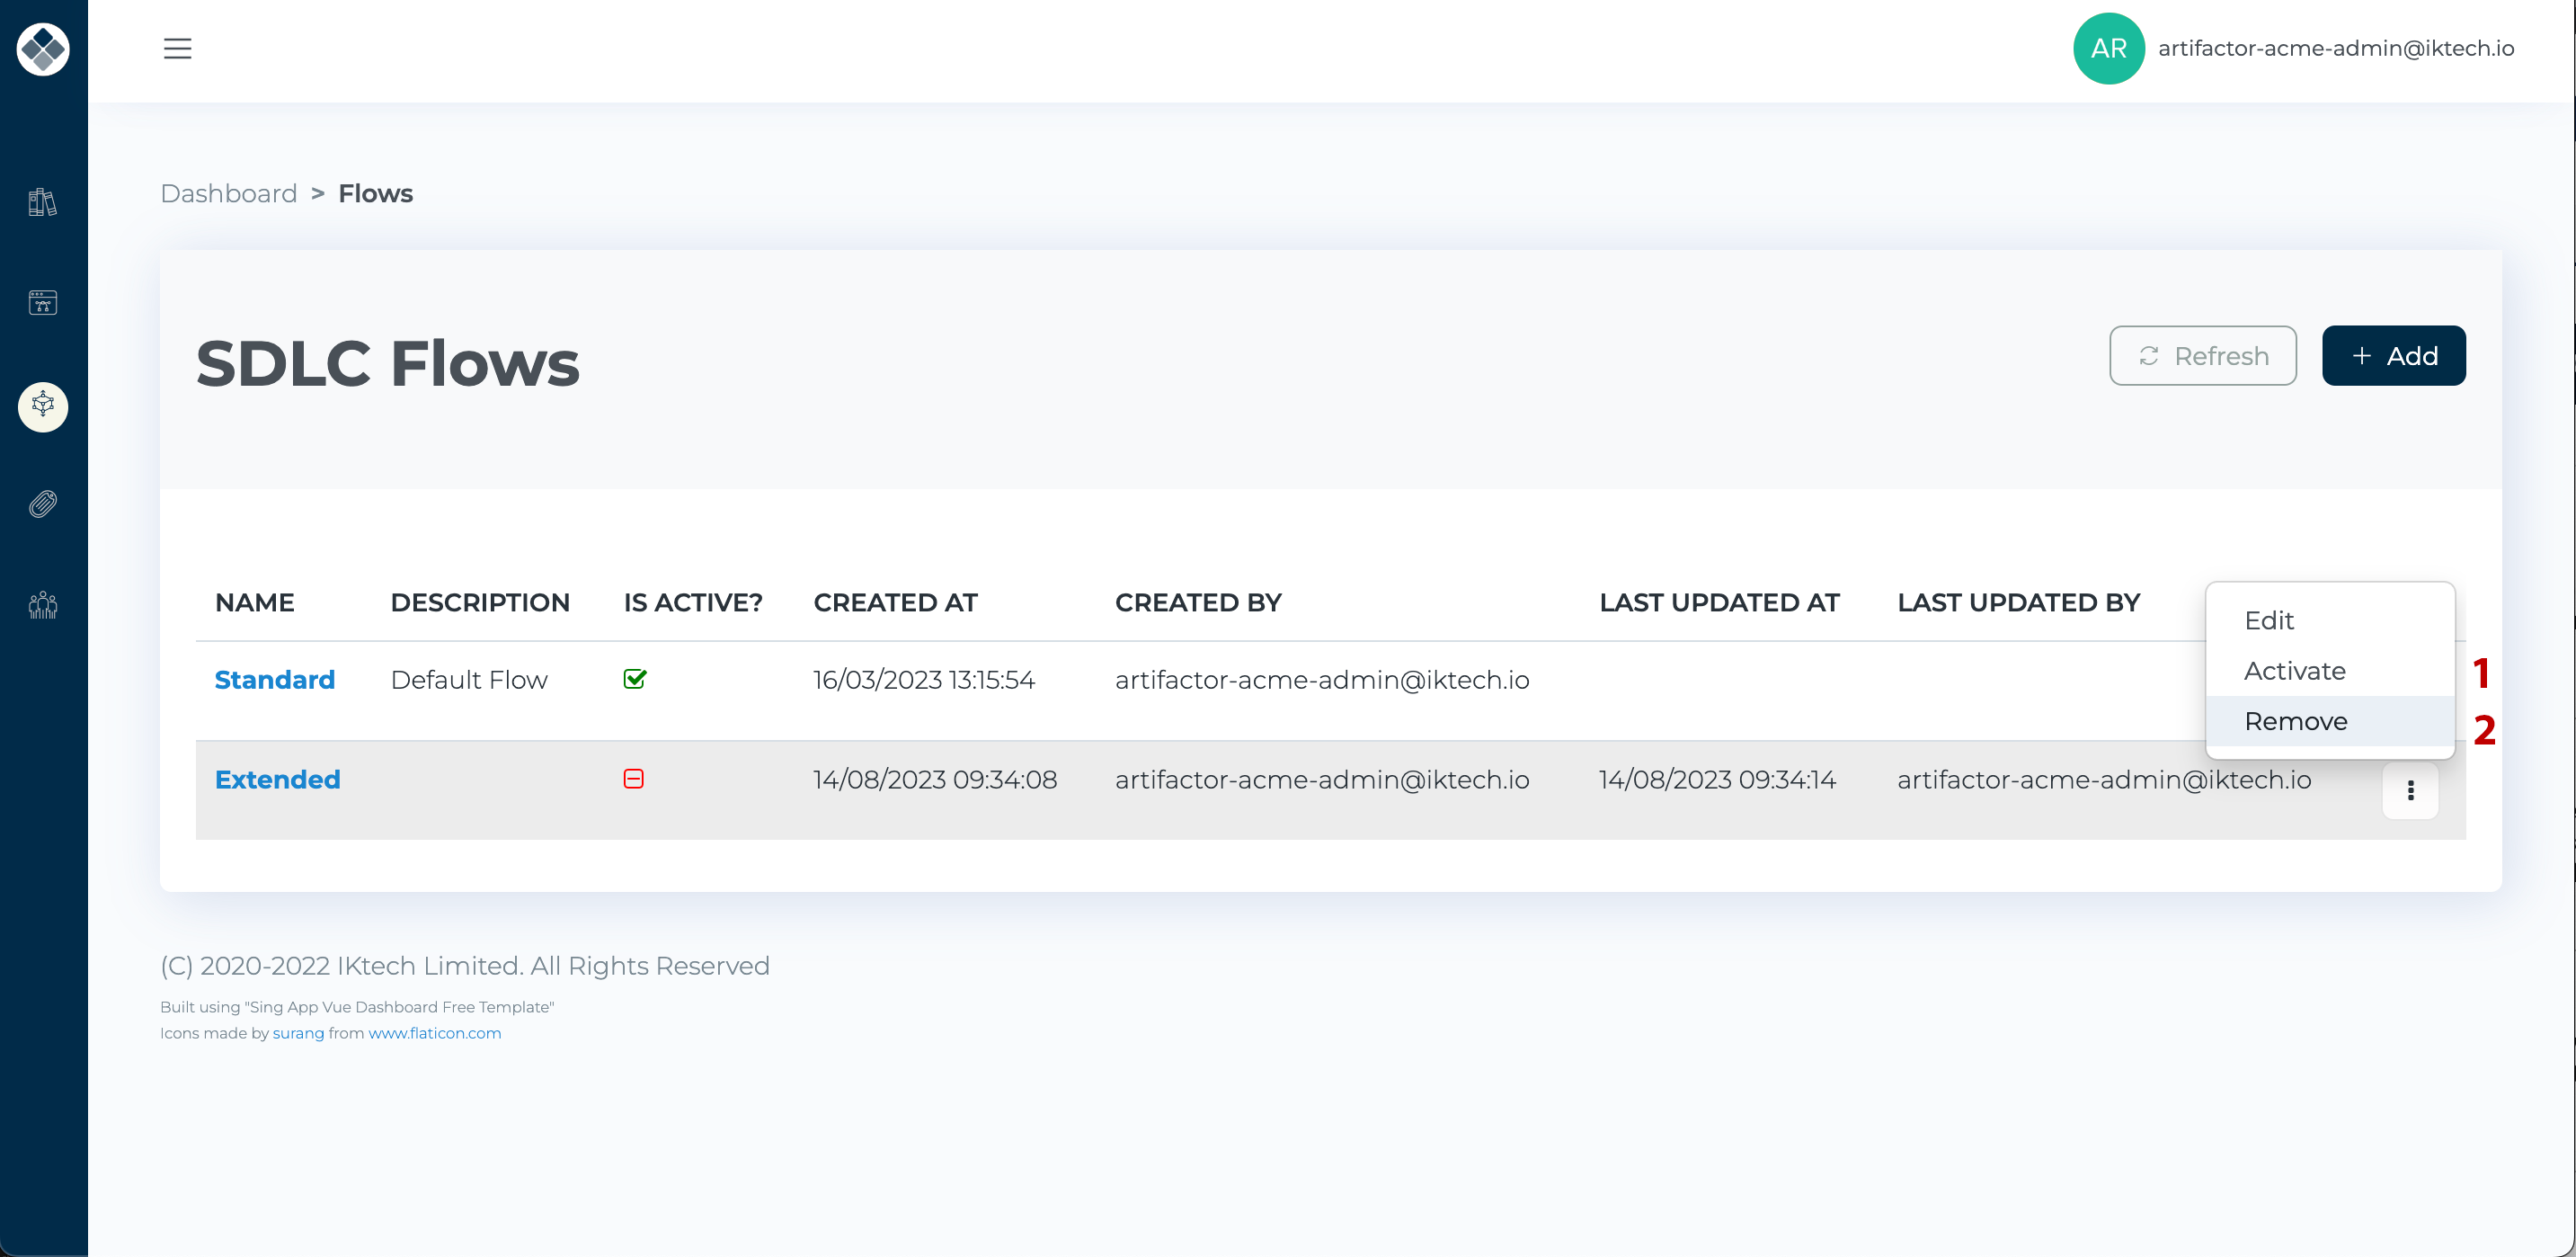
From this menu, users can “Edit” flow metadata, “Activate” or “Delete” the flow.
Choosing the “Edit” [1] option prompts a dialog box identical to the one used when adding a flow. Within this dialog, you can modify the flow”s name and/or description. Click “Save” to apply changes or “Cancel” to dismiss the dialog.
An inactive flow cannot be assigned to an artifact. This feature lets you temporarily disable a flow without deleting it. While an inactive flow can be deleted, there”s no option to delete an active one.
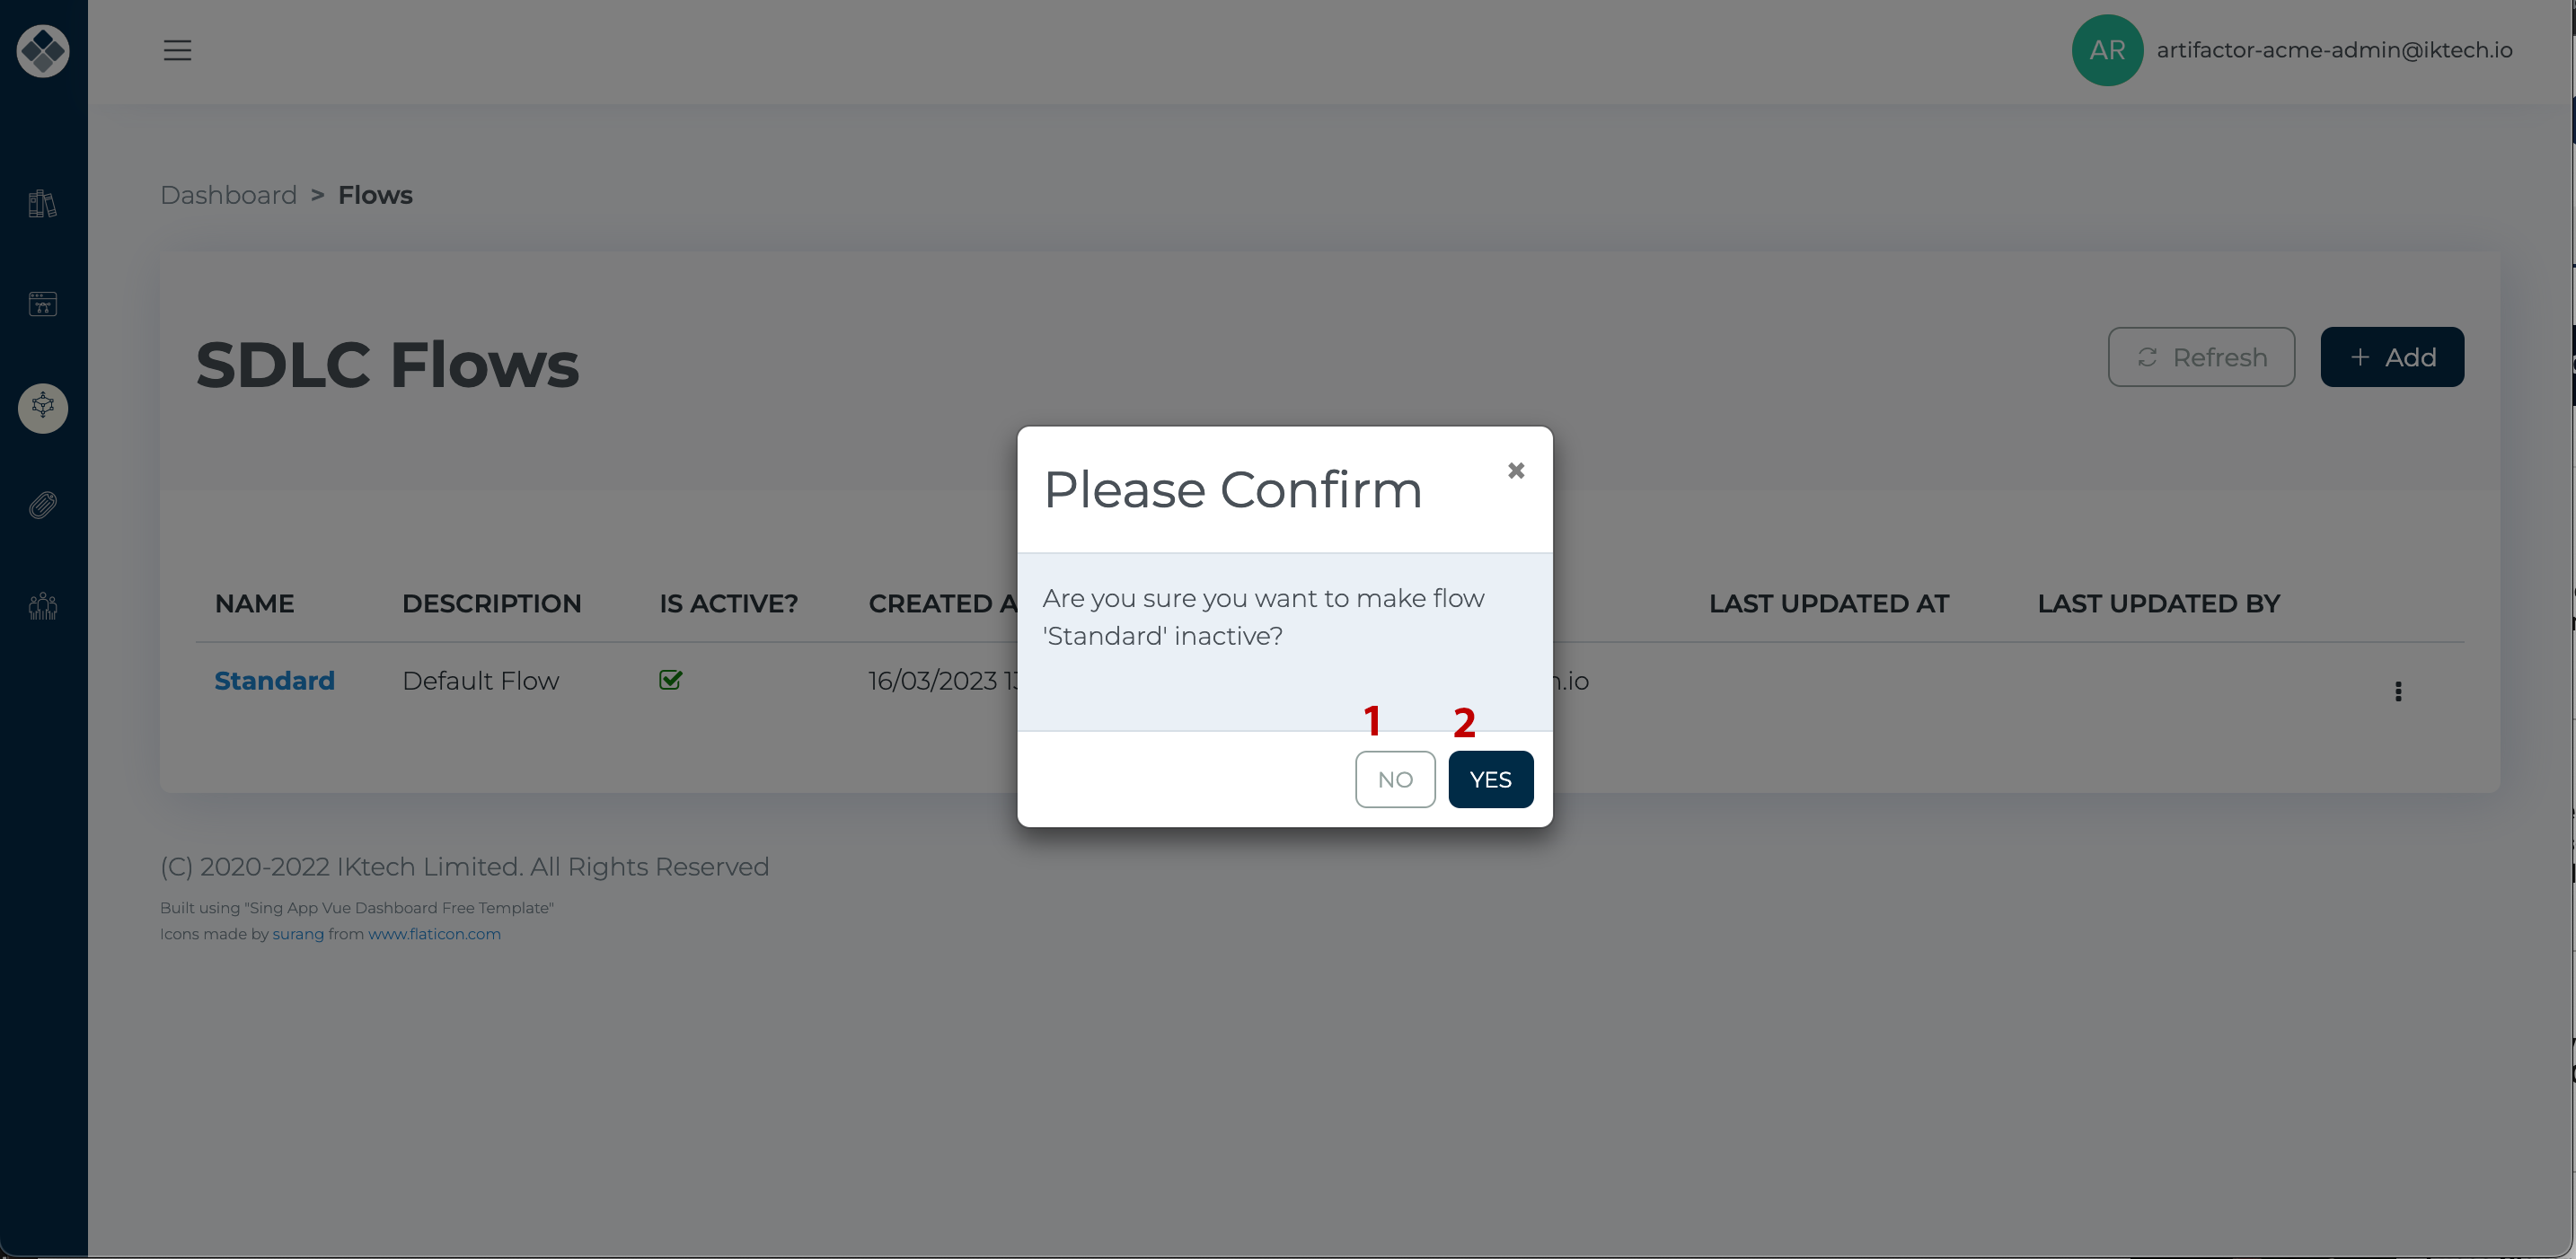
To deactivate a flow, select the appropriate option from the context menu. A confirmation dialog box will appear:
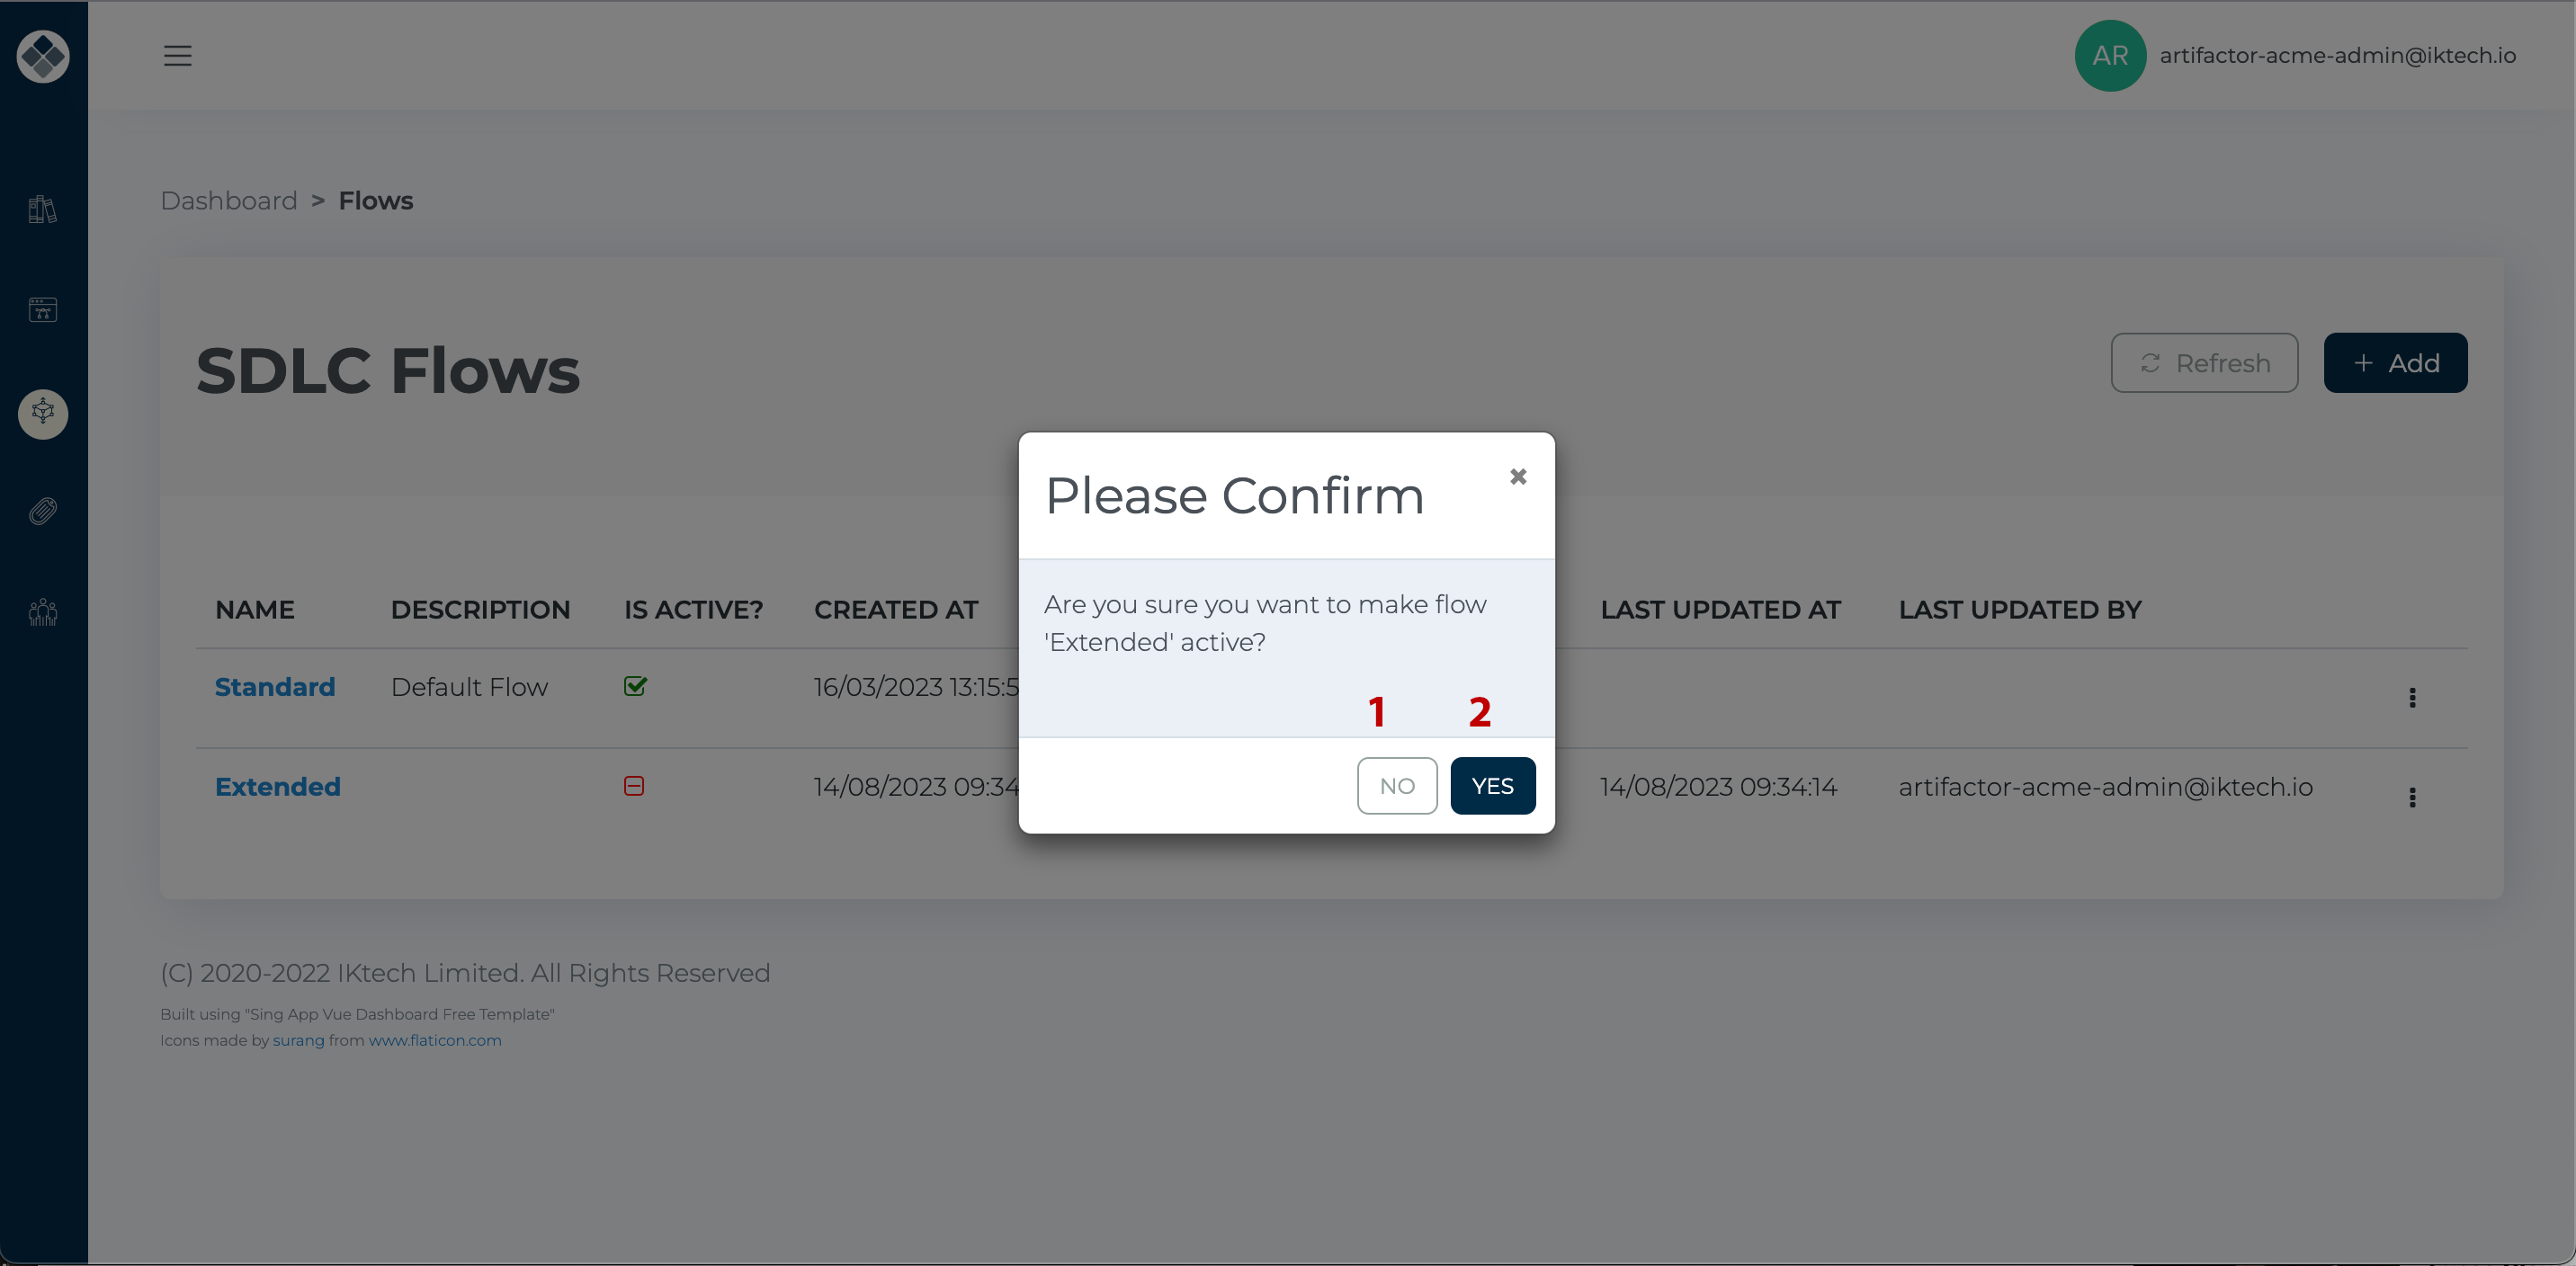
To activate an inactive flow, choose the relevant option from the context menu. A confirmation dialog box will be displayed:
Clicking on the “Delete” [2] option will prompt a confirmation dialog:
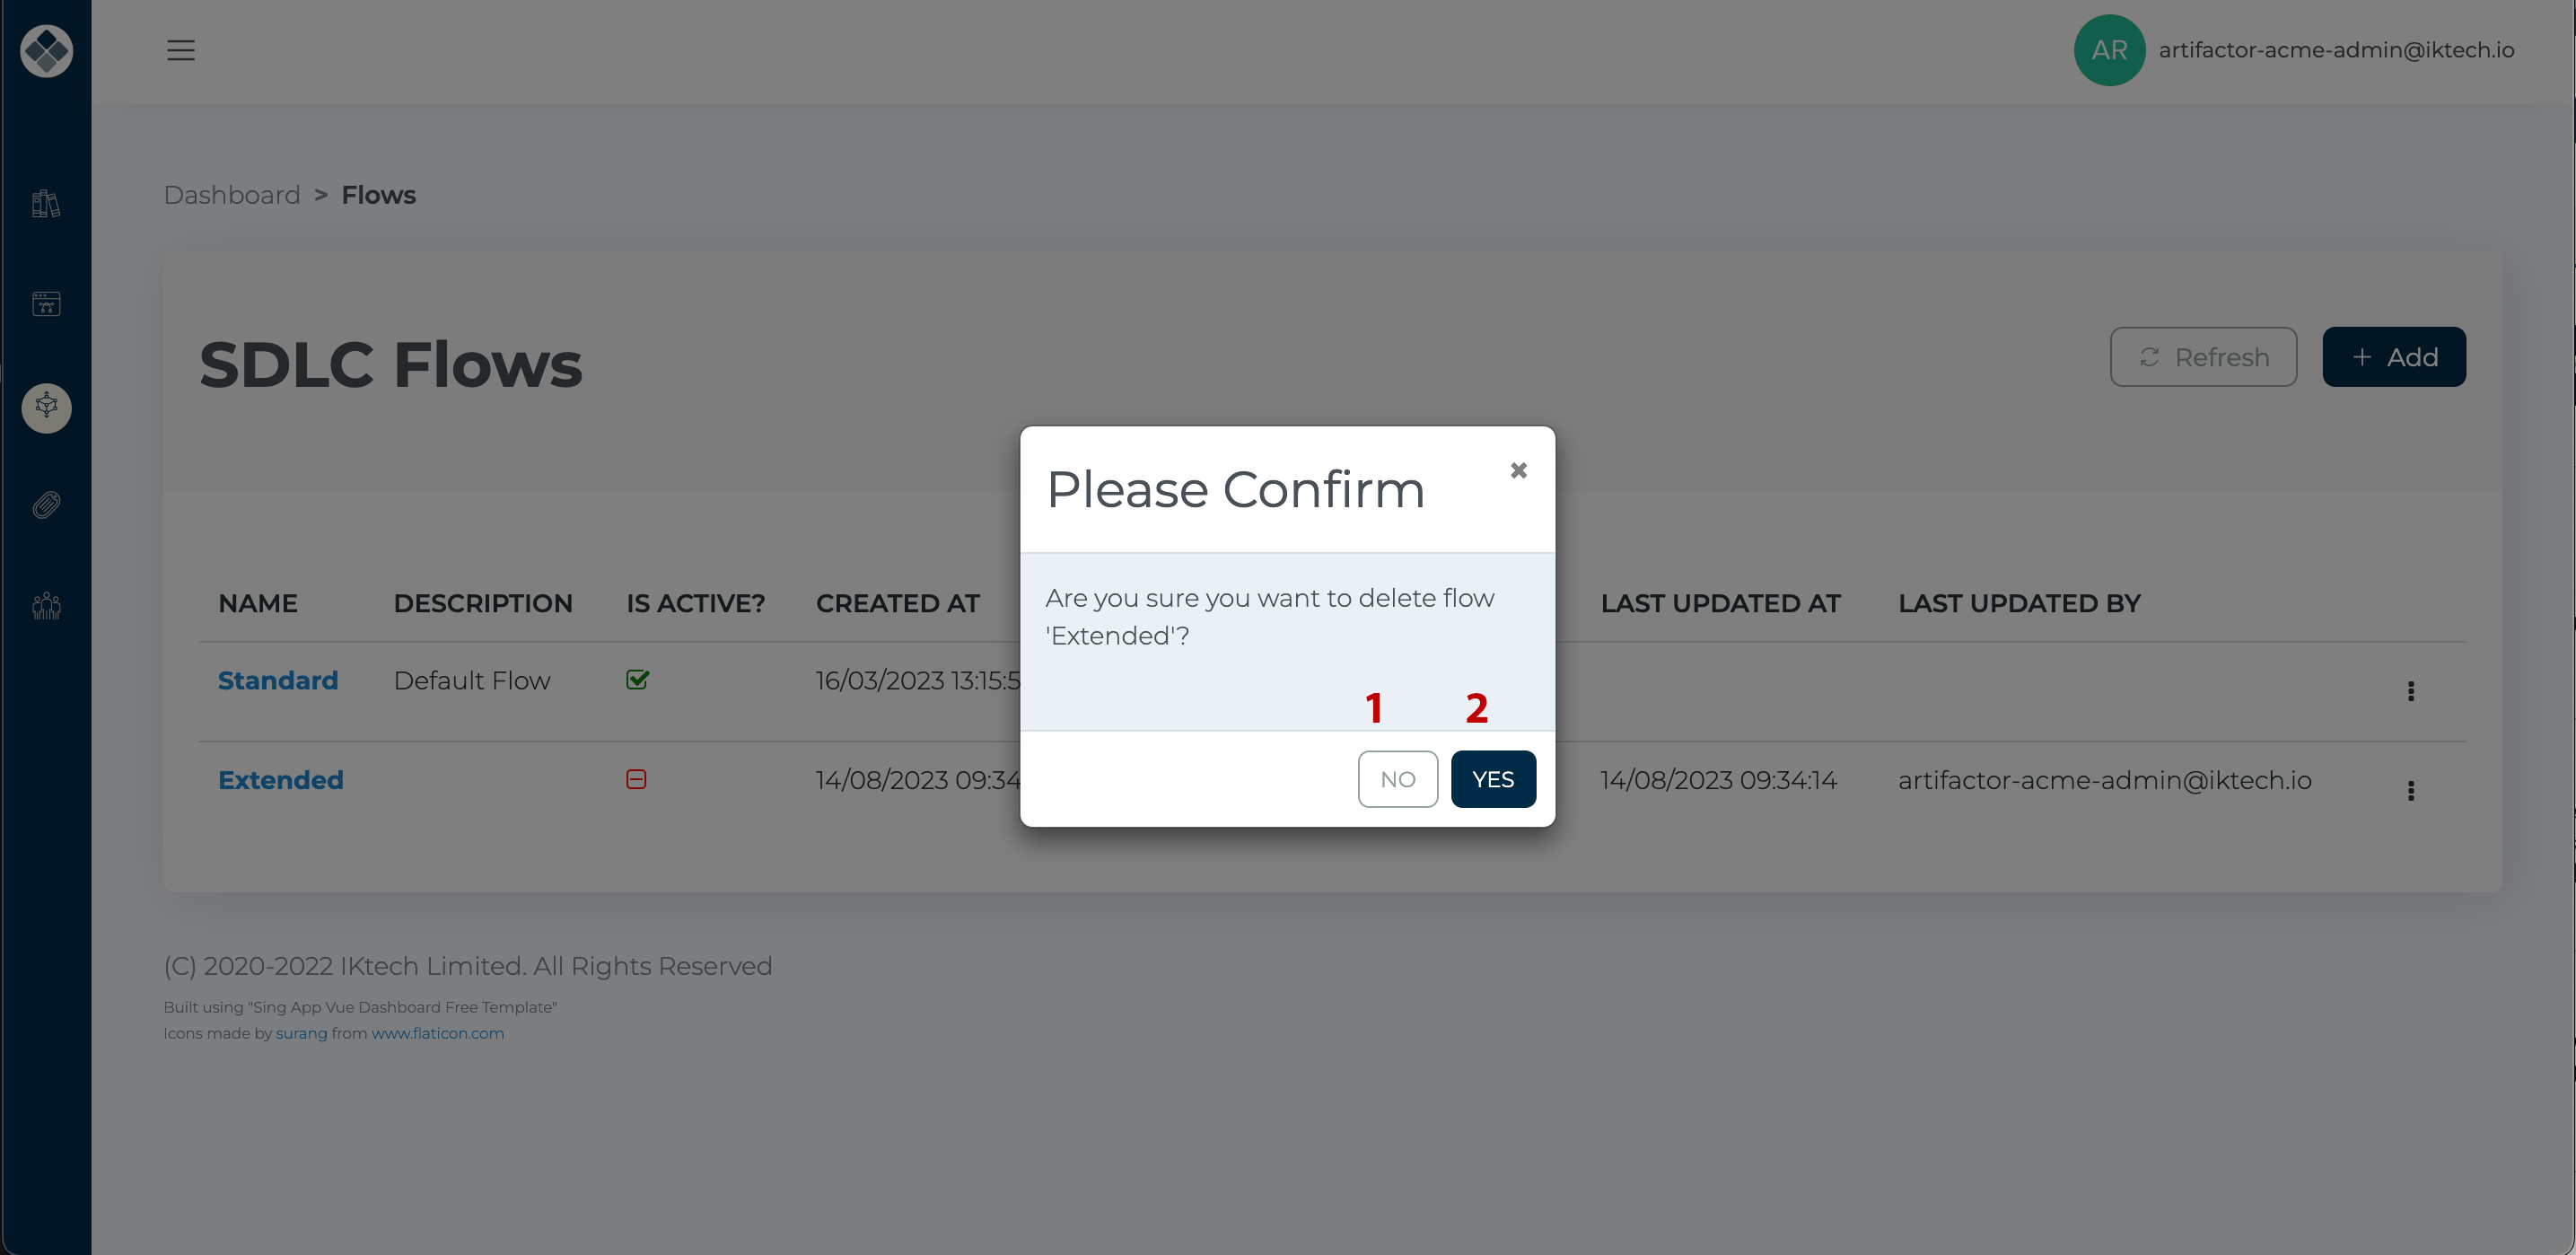
Follow the on-screen instructions to confirm the flow”s deletion by selecting “Yes” [2]. To cancel, click “No” [1].
To make changes to the content of a flow, select the desired flow name from the list. This action will open the Flow Editor in the main section of the screen:

The Flow Editor consists of two main parts:
- The editing area in the middle with the grid [2].
- The Available Stages stencil [1].
In the top right corner, you’ll find a “Save” button [3], allowing you to save any modifications you make.
Stages in the Flow Editor can be rearranged within the editing area by dragging them around. However, it’s important to note that reordering the Stages physically on the screen does not impact their sequence; only the connectors between Stages determine their sequence in the Flow.
You can drag Stages from the Available Stages stencil using your mouse to add them to the Flow.
Each Stage once placed into the flow has two connector ports:
- One at the top of the Stage box for incoming connectors.
- One at the bottom of the stage for outgoing connectors.
To reveal the controls, hover your mouse over the desired stage. Connector ports and a small red “Delete” button with a white cross will appear.
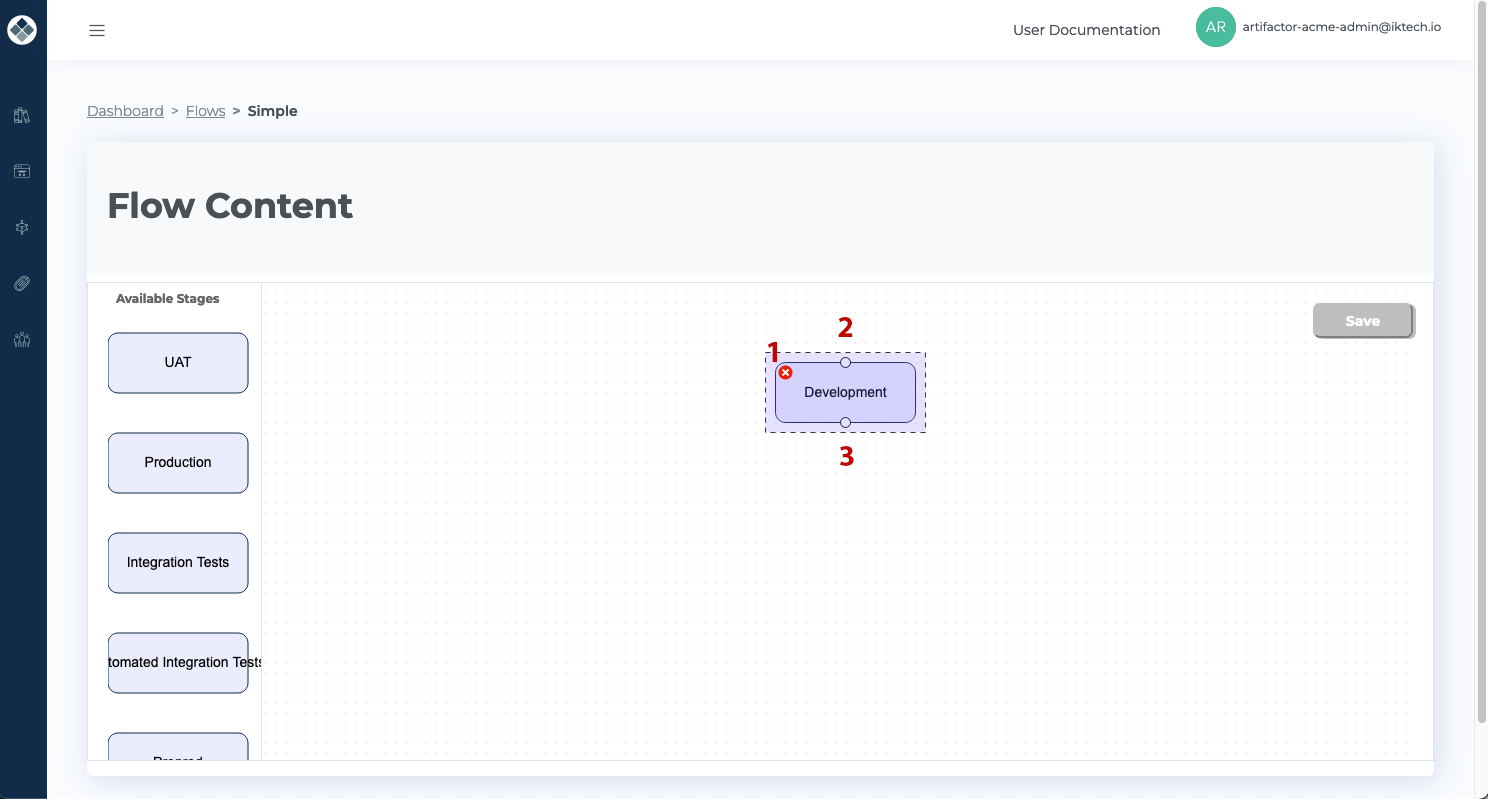
To delete a stage, simply click the red button.
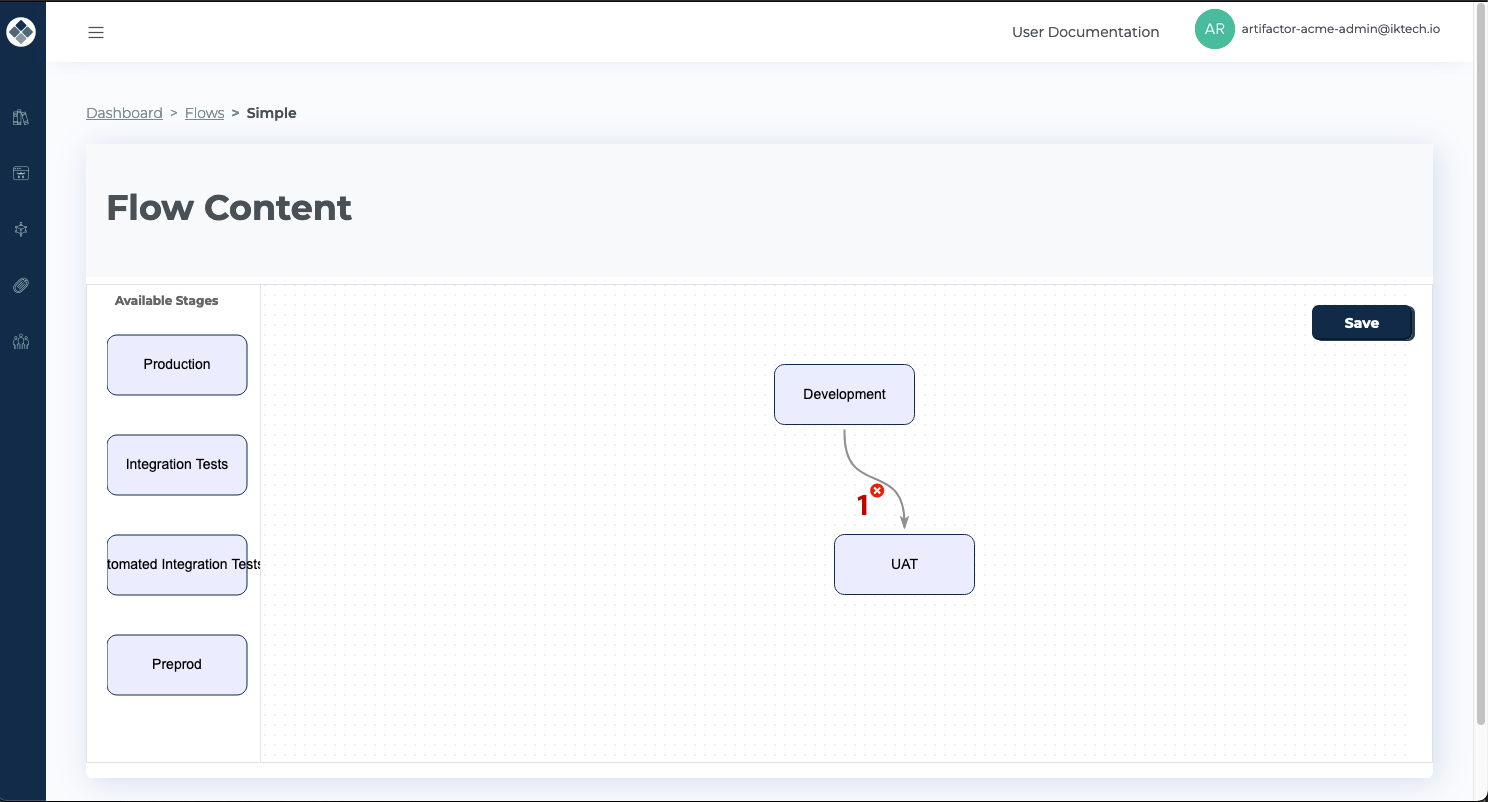
To link a stage to another one, position the mouse pointer above the outgoing connector port. Once the pointer appearance changes to a vertical cross, click the left mouse button (or the mouse button on a Mac) and drag the connector to the incoming connector port of the target stage.
To delete an existing connector, hover your mouse over the connector in question and click the small red “Delete” button that appears next to it.
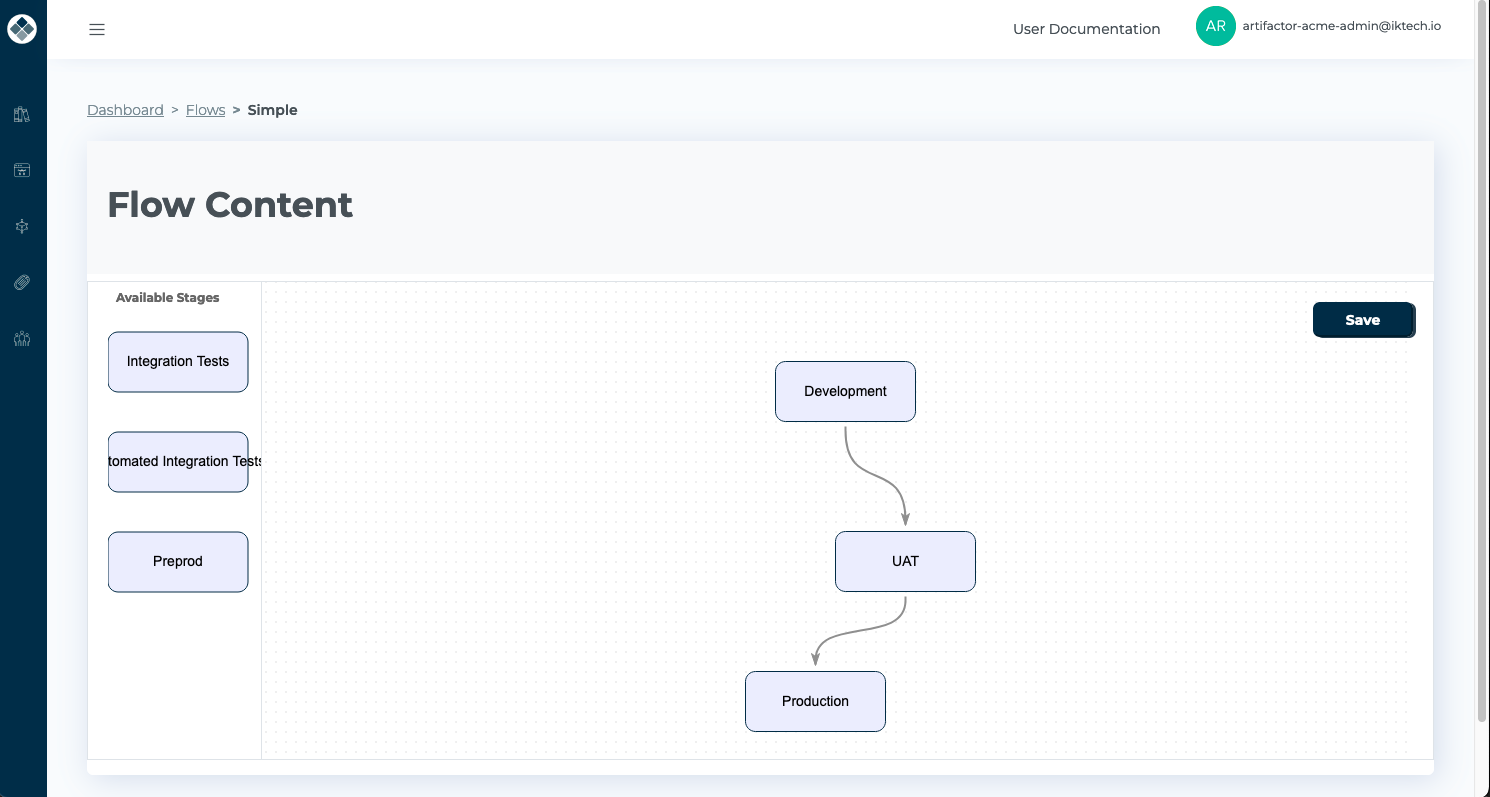
The “Save” button will be disabled unless the service detects a valid flow.
A valid flow must have at least two Stages, one initial Stage (with no incoming connector), exactly one end Stage (with no outgoing connector), and each intermediate Stage must have one incoming and one outgoing connector.
You can observe an example of an invalid flow in the following image:
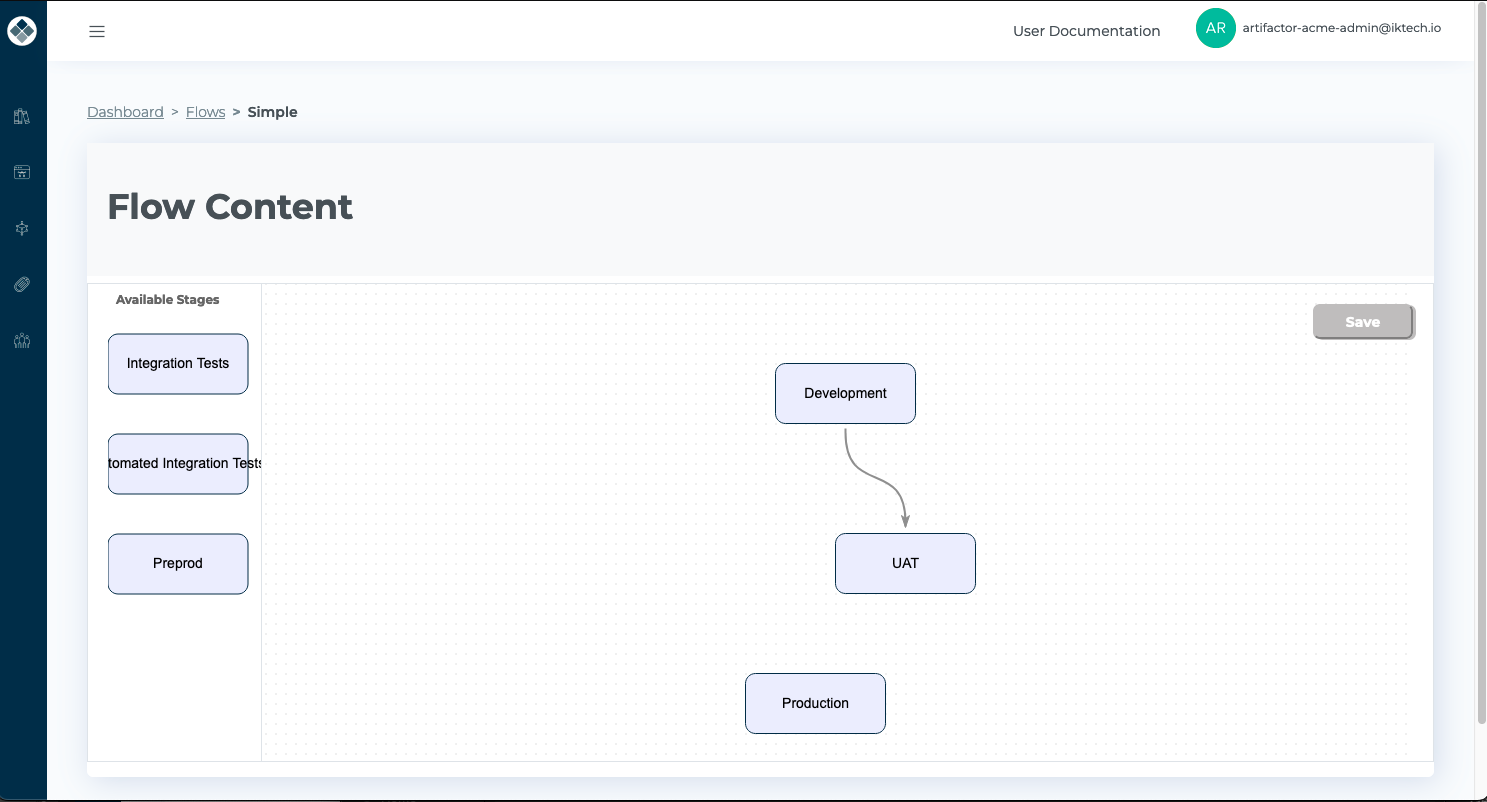
In this example, the “Production” stage is dangling, rendering the flow invalid.
The following image showcases a valid Flow:
Note that navigating away from the Flow Editor without saving results in the loss of all unsaved changes. Always ensure to save the latest version of the flow before leaving the Flow Editor.
Additionally, be mindful that saving a reduced flow may impact associated artifacts. If you proceed, the artifacts linked to the removed stages will lose version information associated with the stages being removed. Pay attention to warnings as you save your changes.